Choosing the correct clinch tooling is essential to creating strong, durable joints.
These are the fundamentals of clinch tooling with an overview of dies and punches, and practical insights to help you achieve the best results in your metal joining applications.
What is clinching?
Clinching is a mechanical fastening process used to join sheet metal without fasteners. The process involves deforming the materials to create a strong, interlocking joint.
It starts with a punch, which creates an indentation in the metal sheets. The die anvil supports the sheets and distributes the applied force, while die blades and die elastomer shape the joint and return to their positions after clinching.
This method is widely used in various industries due to its efficiency and strength. Clinch tooling typically refers to the dies and punches attached to the clinching machine.
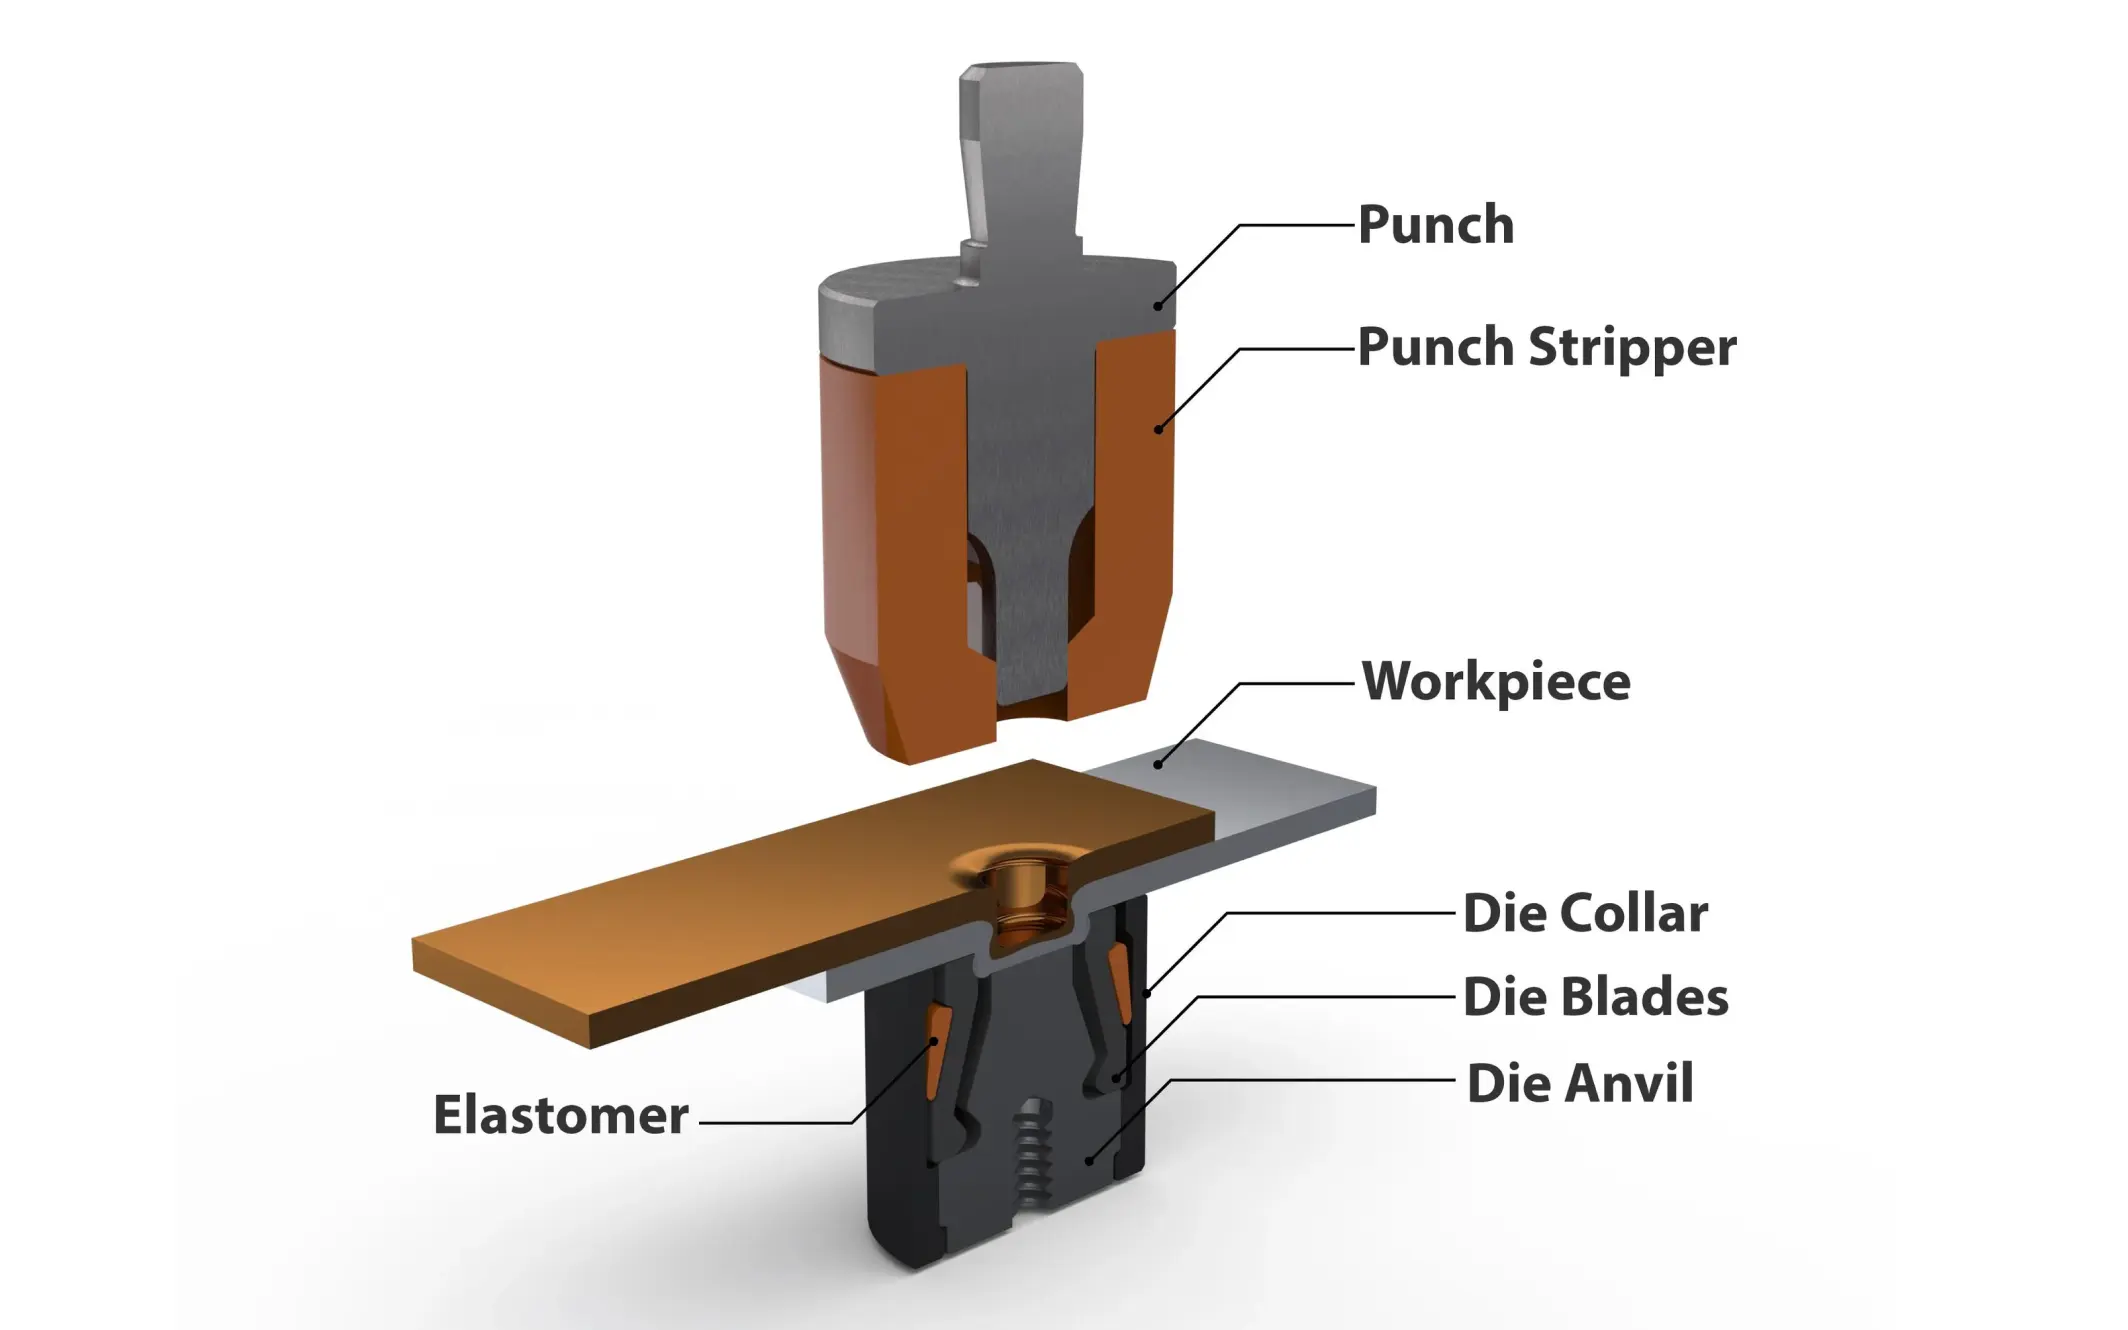
These are all the components involved in that process:
- The punch initiates the clinching process by creating an indentation in the metal sheets. It is a crucial component that determines the shape and size of the joint.
- The punch stripper removes the punched material from the punch. It helps maintain consistent quality and prevents material build-up on the punch.
- The die anvil distributes the force evenly. It is the counterpart to the punch and plays a vital role in forming a strong joint.
- The anvil depth (AD) refers to the depth of the anvil cavity into which the material is squeezed. The depth varies with the thickness of the material; thicker materials require a deeper anvil depth.
- Die blades shape the clinch joint and allow lateral (sideways) flow of material as it is squeezed.
- Often made of rubber, the die elastomer returns the die blades to their home position after forming the clinch.
- The die collar protects the die blades from damage by preventing them from being pinched against the material.
- Tonnage is the amount of force used to drive the punch and die together.
Here’s an illustration of the components of clinching tooling in action.
The different types of clinching dies
There are two main types of dies:
- Extensible wall dies are most commonly used. They’re also known as bladed dies because they have movable blades that shape the joint, which makes them flexible and suitable for different materials and thicknesses. A rubber band holds their components together, which can introduce a potential weakness.
- Fixed-wall dies do not have movable blades. They press the material into a fixed form. They’re commonly used in automotive applications, but they might not be the best option if you’re doing custom work or need to change the materials you’re working with regularly. You typically have to match the die (and punch) to the material you’re working with. These dies require more energy to form connections with and are much more difficult to keep clean when material (galvanized or paint build up) gets inside them
Press Lock Technologies has focused on extensible dies due to their wider application capability and easier use and maintenance.
Dies come in different shapes.
Round clinching dies
Round dies are used for drawable materials.
They don’t have cutting edges, making them last a long time. They also distribute force across the entire joint, so the joint is equally strong no matter which direction force is applied from.
You do need a minimum of two connections to prevent material from rotating, however.
Square or rectangular clinching dies
Square or rectangular dies are suitable for harder materials like stainless steel.
They’re very good at handling thickness disparities on the punch side, and they can clinch more layers. We’ve had experience getting up to seven layers clinched with a rectangular die.
But because they cut the material, they introduce a weakness to it, and the tools don’t last quite as long. The joint's strength profile will also be different depending on whether the force approaches the joint parallel to the edge or perpendicular to it.
Clinching punches and how to use them
Clinching punches come in three shapes:
- Round punches are the most common and standard shape. They’re ideal for most joining tasks.
- Square punches are used for precise or custom-shaped joints, but may lead to leaks.
- Oval punches are much rarer, but they also exist. They create non-rotational, watertight joints without cutting the material.
The Punch Tip Radius (PTR) is the radius at the tip of the punch. A smaller tip radius can cause breakage in softer materials, while harder materials typically require a sharper radius to ensure effective clinching.
You typically want the thicker and harder material on the punch side. If a soft or thin material is on the punch side, it just won’t stretch enough or be strong enough to push the die material out of the way.
How tonnage impacts clinch tooling
Tonnage refers to the amount of force applied by the punch to deform the material and create a secure joint.
The required tonnage depends on the material type, thickness, and joint design. You can imagine stainless steel requires a different amount of force to clinch than aluminum, for example.
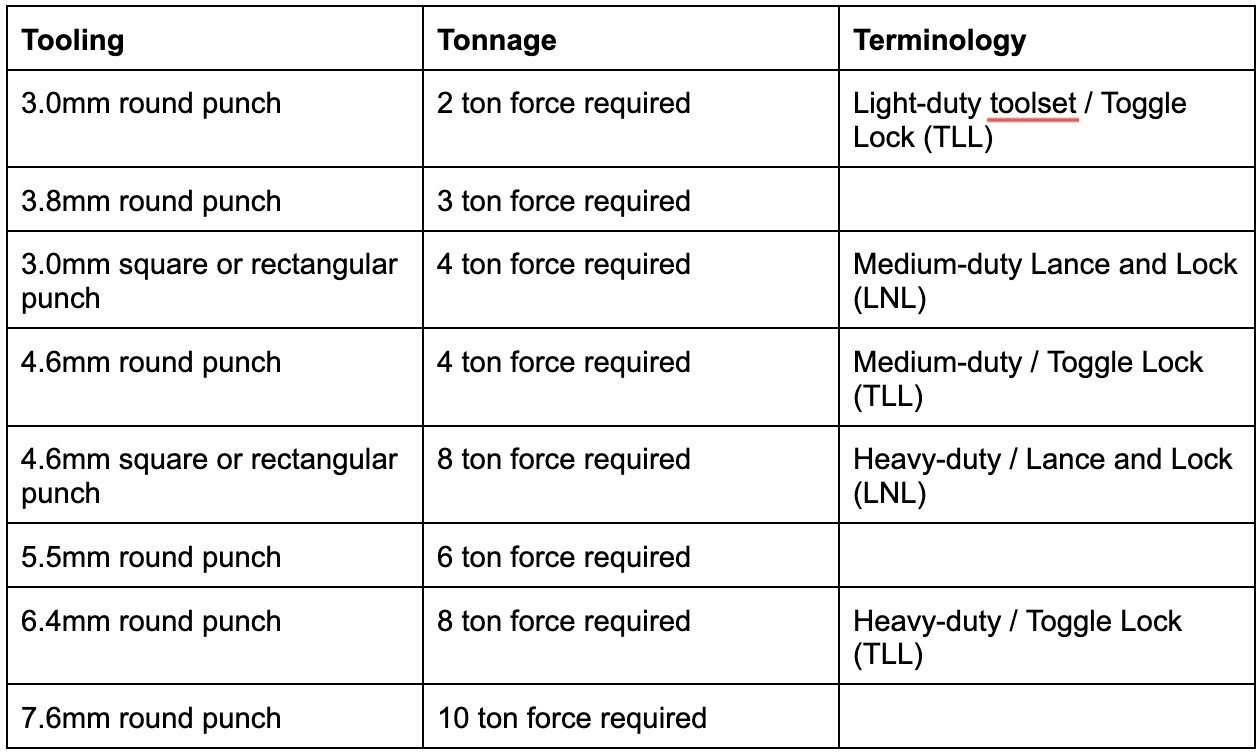
Some manufacturers refer to heavy, medium, and light-duty punches instead, but tonnage is a little more precise. Clinching machines most commonly apply 2, 4, or 8 tons of force, although some tools exist for 3t, 5t, and even 10t. Micro-clinching for electronics might go down 1t.
Here’s an overview of the terminology based on the type of punch. You can purchase these options from Press Lock:
Correct tonnage is crucial to:
- Prevent material deformation. Too much force can cause damage.
- Ensure joint quality. Too little force results in weak joints.
- Extend tool lifespan. Excessive force will damage the die, punch, or both.
Check out these tips to troubleshoot your clinch joints if needed.
Selecting the right clinching tooling
Selecting the right clinch tooling is simpler than it might seem. For the majority of common applications and the standard metals (in similar thicknesses), you can use the measurements listed in a catalog and test those.
But tooling does have to be adjusted based on the application. Clinching isn’t a method like welding, for example, where you can redo the clinch a second time to make it stronger. And sometimes creating the strongest possible joint is less important than having the versatility of being able to use the same tooling for different jobs.
If you’re looking for clinch tooling you can rely on, check out our products here. We’re also happy to provide guidance about your specific use case.
.webp)

Take our 5-day course
Get an article every day for 5 days
Don’t have time to read everything now? Sign up and we’ll send you an article every day for 10 days.